Setting Up Authenticator Apps
See why customers enjoy using Pleasant Password Server with a KeePass client
(Versions 7+)
Provides Two Factor Authentication (2FA) using One Time Password (OTP) codes generated by the Google Authenticator App, or other similar apps.
Supported Authenticator Apps:
- Google Authenticator, Microsoft Authenticator, Authy, DUO mobile, etc.
- See Supported Providers for more...
Prerequisites:
- Time-Synchronization must be enabled: on the Server machine & client devices
- Users can self-enroll or are configured with 2FA, before the policy requires 2FA
- Warning: Be careful when setting Two Factor Required, as it could prevent users from logging in unless:
- Their accounts can be self-enrolled, or,
- They have been individually configured to use at least one 2FA provider (eg. Authenticator Apps).
- If users have already been locked out, please Contact us!
Step 1: Configure the Provider
- Open an existing Policy
- Once the policy is created: you will see a list of possible 2FA Providers:

- Under Two Factor Policy section, click Configure in the Google Authenticator row of the Configurations table:

- Service Name: Enter a service name. This will be seen in the application as the label for the Token Generator and will be seen by all Policy users
- Click the Enabled checkbox: the other checkboxes are optional - read their explanations for further details.
- Click Save.
Step 2: Configure Two-Factor Settings
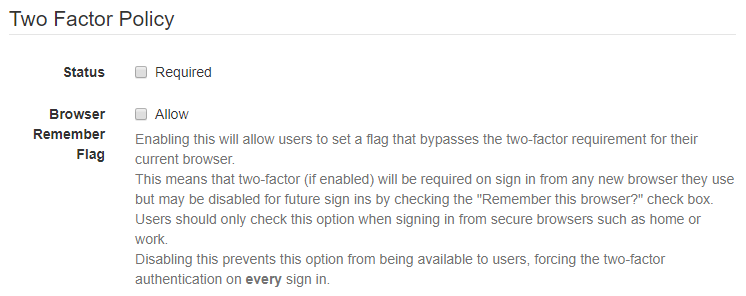
- Status Required: Requires all users who have been assigned this policy to authenticate with 2FA
- Note: 2FA Required will prevent users subject to this Policy from logging in unless their accounts
- Self-Enrollment will not be possible if this flag is not checked.
- have been individually configured to use at least one TFA provider (eg. Google Authenticator).
- If users have already been locked out, please Contact us!
- Browser Remember Flag: Allows users skip 2FA for secure browsers
- Refer to Two Factor Authentication for additional details of the options (below):

Step 3: Set the Policy
- Attach the Policy to a Role or User:
- Attach to a Role:
- Navigate to Users & Roles > Manage Policies.
- Click Set Role Policy (in the Role Policies section).
- In the popup that results (shown below), attach the Policy to a role of your choice and click Set policy.
- Attach to a Role:

- Attach to a User
- Navigate to "Users & Roles > Manage Users"
- Either click Add New User, or click Edit in an existing user's "Actions" dropdown
- Set the "Policy" field appropriately
- Click Create or Save (as appropriate)
- Attach to a User
Step 4: (Optional) Configure a User's Secret
- It is best to let the user configure their own secret, however, admins can also set as necessary.
- Navigate to Users & Roles > Manage Users
- Click the name of either a user with the role from step 3 or the user from step 4.
- In the Policy Information section you should see a 2FA table; click Configure in the Google Authenticator row.
- Click Enable; you'll be taken back to the user's Details page.
- Click Configure again, and keep the resulting page open.
- (Optionally) Save the secret in a secure location, and/or forward this info to the user.
Step 5: Double-Check Server Time Synchronization
- The Authenticator application protocol is time-based
- Ensure that the server and mobile devices remain synced with Network Time Protocol (NTP)
- This is necessary for this algorithm to function correctly
- If the time on any of these are out-of-sync (even by 30 seconds), the user will have trouble authenticating:
- Check:
- The Server time
- The Device time
- The Authenticator app time (Android) - this app feature can be used to compensate for the device time
- Check:
- more info: Google Authenticator help
- This has been the only authentication issue for users of Authenticator apps, which gives an "Invalid Token" error.
Step 6: Use the App
Choosing Your Two Factor Authenticator
Users with more than one 2FA Provider configured (whether directly or via their roles) will be prompted to choose one during login:

