
Setting Up YubiKey Authentication
Discover how Pleasant Password Server will enhance KeePass for business
(Versions 7+)
This is a quick guide to setting up with YubiKey Hardware Key authentication with Pleasant Password Server.
For background information on YubiKey Authentication Services: start here.
Before you begin, make sure you:
- have a YubiKey USB device plugged in and within reach; and
- install any YubiKey software that came with the device.
Note: Remember which of your YubiKey's two configuration slots you are using with Password Server - using the
wrong slot will cause errors.
Supported YubiKey Devices
- YubiKey NFC, Neo (OTP, TOTP)
- YubiKey 5, 4, Nano (OTP)
- YubiKey 5C, 4C, Nano (OTP)
More info: Compare YubiKeys
Step 1: Create a new Policy (Optional)
Create a new Policy: to use Two-Factor Authentication (2FA):
- Navigate to "Users & Roles > Manage Policies".
- Create a new policy and set the applicable fields and flags.
Note:
- Making 2FA Required will
- unless their
accounts have been individually configured to use at least one 2FA provider (eg. YubiKey).
If you're setting up two factor for the first time and you've made 2FA Required, follow these
instructions to the end to avoid locking out users.
If you're already locked out, please Contact us! - Click Create.
- You'll be returned to the "Manage Policies" page, where you'll see the policy you just created.
Step 2: Configure the Two Factor Policy
- Set policy: to use two factor authentication (YubiKey):
- Click the name of the policy you just created, or that of another policy you want to change.
- Two Factor Policy section > Configurations table > YubiKey row > click [Configure]

-
- Click the "Enabled" checkbox
- Other checkbox settings are optional: read the explanations for details.
- Navigate to the Yubico website to obtain a Client ID and API Key.
- You'll need to provide:
- an email address which has been configured to use that YubiKey device; and
- a one time password (get one by using your YubiKey device).
- Ensure your cursor is in the YubiKey OTP text box and press the light up button on the bottom of the YubiKey device. This will generate the OTP at your cursors location.
- You will be provided a Client ID and an API Key
- You'll need to provide:
- Enter your Client ID and API Key.
- (Optional) If you are running your own YubiKey Authentication Server, click + Add Server and enter its URL.
- Your setup may resemble the following:

-
- Click Save.
Step 3: Configure the User for YubiKey
- Navigate to "Users & Roles -> Manage Users" and click Edit in an existing user's "Actions" dropdown.
- Set the "Policy" field appropriately, then click Save.
- You'll be taken to the user's "Details" page. In the "Policy Information" section you'll see a "Two Factor Authentication" table; click [Configure] in the YubiKey row.
- You'll be taken to the YubiKey page, which has a single entry field:

- Select the text box and press the button on your YubiKey; you'll see text appear, and:
- Success: If the Key is accepted it will auto-save and close this window, and return you to the previous screen.
- Failure: If the Key was not accepted it will show a notification of a "Failed to verify... Please try again"
- Clear the text, and press the YubiKey button again
- Click Save.
Step 4: Authenticate with YubiKey
- Try to log in as the user you configured 2FA for.
- After you click Sign In, you'll see the following:
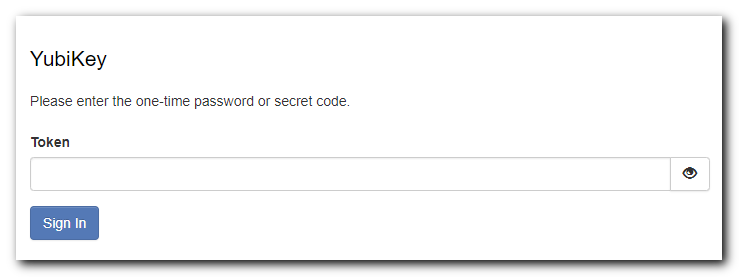
- Select the text box and press the button on your YubiKey; you'll see text appear.
- Click Sign In.
Choosing Your Two Factor Authenticator
Users with more than one 2FA Provider configured (whether directly or via their roles) will be prompted to chose one during login:
