Settings SMTP Email Configuration
Use KeePass with Pleasant Password Server
Simple Mail Transfer Protocol (SMTP) configuration is included in many Pleasant Password Server features, however, Email integration is optional.
Sections:
- Initial Email Setup
- Test SMTP Email
- Confirm User Email Addresses
- Email Setup with Office 365
- Troubleshooting
Authentication
The SMTP protocol will attempt to connect using a compatible authentication method supported by your SMTP server.
Note: We explicitly do not support XOAUTH2 as a mechanism
Initial Email Setup
Note: Email setup is optional.
Step 1: Configure Email
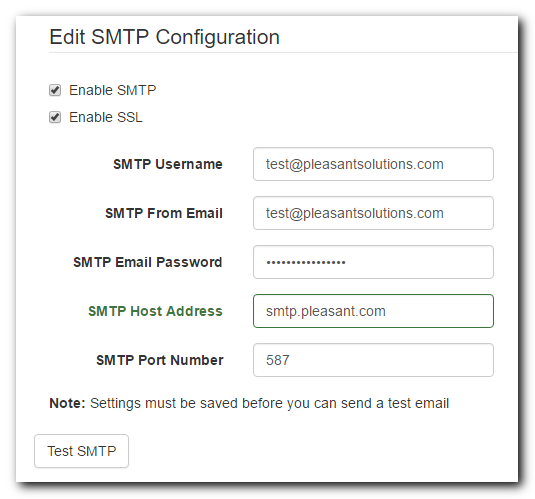
To setup email integration, navigate to: the Web Application > Settings menu > Email
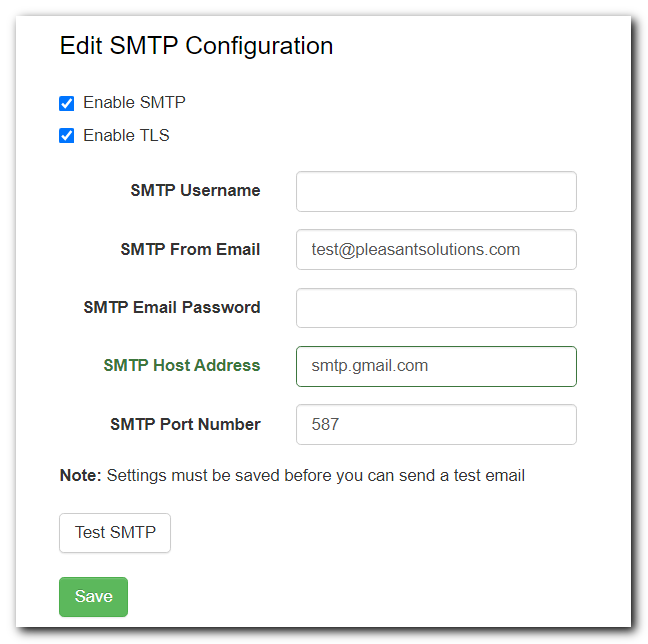
- Specify Username/Password, or not (screenshots)


Enable SSL:
-
If TLS is required by your email provider, then select this option.
Username & Password:
- These fields remain blank, if no authentication is required.
- However, if the Username is provided than a password is needed as well.
SMTP Host Address:
- The URL or IP address of your SMTP Server.
SMTP Port Number:
- Port 587 is the default
- Check if your SMTP server supports STARTTLS over port 587
- Port 25: Note that this port is blocked by Azure VM's
Test SMTP Email
Step 2: Test
- Click Save
- First, the SMTP configurations must be saved before a test email can be sent.
-
Click Test SMTP
- Checks that the SMTP configuration is valid, by sending to a specified email address.
- Expected Results:
- The Email attempt will display this message:
- "Attempting to send a test email to __________________"
- The Email attempt will display this message:
Confirm User Email Addresses
Step 3: Ensure users will receive the email
Users require a valid, confirmed email address, without which they will not receive email notifications. Directory users' email addresses will be imported and auto-confirmed.
- Click 'Confirm' - for Local users email address:
- Ensure valid email addresses are entered and confirmed for local users.
- Navigate to:
- Users and roles > Click on user's profile
- Click the Confirmed? checkbox for the email address.
Email Setup with Office 365
Here are instructions for integrating with Office 365 Email:
-
Log into your Password Server > click on Settings > then Email
-
In the 'Edit SMTP Configuration' page, enable the 'Enable SMTP' and 'Enable SSL' and fill out the fields using this guide:
- (These fields may be optional):
- SMTP Username: <email address>
- SMTP Password: [password to authenticate above email address]
- SMTP From Email: <email address, same as above>
- SMTP Host Address: smtp.office365.com
- SMTP Port Number: 587
- (These fields may be optional):
-
Review the settings and click on 'Save'.
-
Click on 'Test SMTP' then enter an email address to test the settings.
- Click on 'Send Test Email' and check the mailbox for the test account.
Troubleshooting
If you are unable to receive a test email check the possible problems below.
-
View "Email Logging" Details
- Get more Detailed Logging information for Email (section "Email Logging")
- If you see an "Account is not valid" error:
-
Double-check the settings / username & password. Perhaps Username & Password can remain blank, but otherwise if required, provide both username & password
-
-
White-list this IP on your email gateway
-
Is Firewall / Anti-virus Blocking Outbound Emails
- You may be seeing an error like this: "No connection could be made because the target machine actively refused it"
- Is SMTP traffic going through your firewall? If not, you have a firewall blocking outbound email, and the process to exclude is:
"%ProgramFiles(x86)%\Pleasant Solutions\Pleasant Password Server\PassMan.WindowsService.exe"
(Note: this location is the default install directory, but may have been changed to another folder)
-
Port 25
-
Note that Azure blocks Port 25 by default.
-
- Host Address / IP Resolution
-
Ensure your host address resolves to the correct IP address, and not to a other/secondary machine, etc.
-
- Authentication Method
-
Your SMTP server may be expecting an authentication method that is not supported. If TLS is required, then enable it.
-
Check that the SMTP server is accepting authentication with your SMTP username and password.
-
- Check SPAM / Junk Filters
-
If necessary, add email address as a contact to avoid SPAM filters
-
-
Bypass 2FA / 2-Step Verification
- The SMTP email connection does not integrate with 2FA
- Remove any requirements for 2FA or 2-step verification from the Email Configuration
- You may require a special bypass rule that does not require 2FA
- The SMTP email connection does not integrate with 2FA
-
Certificate issues
- If you see a certificate error in the log please consult our trust warnings wiki for more information here.
